🧶 Basic Braiding Techniques
It is important to become familiar with the basic knots at the beginning of your work. This will help you read patterns correctly and create neat, beautiful bracelets. Each knot has its own symbol in the diagram, so understanding these symbols is essential for following the instructions accurately.
🔹 Basic Knots
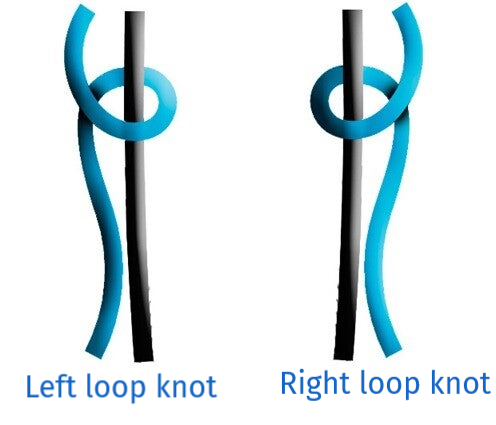
There are two basic knots: left and right. These are simple loop elements that differ in the position of the working thread:
-
In a left knot, the working thread is positioned to the left of the base thread.
-
In a right knot, the working thread is positioned to the right of the base thread.
By combining these knots, four main types are formed:
-
Left / Right
-
Right / Left
-
Left / Left
-
Right / Right
These four knot types are used to weave beginner-friendly muline bracelets.
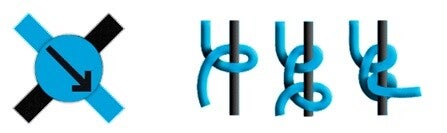
➡️ Straight Knot (Left / Left)
A straight knot is formed by tying two left knots in sequence.
-
In patterns, it is marked with an arrow pointing down and to the right.
-
The working thread moves in this direction.
-
The finished knot takes the color of the working thread.
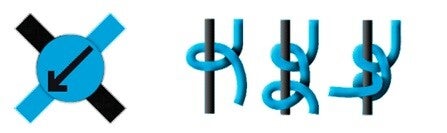
⬅️ Reverse Knot (Right / Right)
A reverse knot is tied in the opposite direction using two right knots.
-
In patterns, it is marked with an arrow pointing down and to the left.
-
The working thread moves to the left.
-
The finished knot takes the color of the working thread.
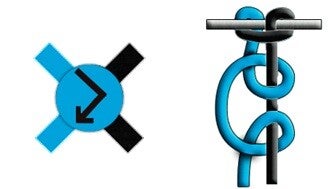
↔️ Left Frivolité (Left / Right)
Left frivolité is formed by tying a left knot followed by a right knot.
How to tie:
1️⃣ Tie one left knot. The working thread moves to the right.
2️⃣ Tie one right knot with the same thread.
After tying, the working thread changes direction and then returns. This movement is reflected in the diagram symbol.

↕️ Right Frivolité (Right / Left)
Right frivolité is tied in the opposite order: right knot followed by left knot.
How to tie:
1️⃣ Tie one right knot.
2️⃣ Tie one left knot with the same thread.
The working thread returns to its original position, as shown in the diagram symbol.
Add comment
Comments