(By Maria Zvereva - Beaded figurines. Zodiac signs with diagrams and detailed explanations. Moscow: Publishing House "E", 2018.)
♐ Sagittarius
✨ Honest and optimistic, Sagittarius will always achieve his goal if it is truly important to him.
📚 Sagittarius constantly strives for learning and for understanding the philosophy of existence.
🧭 He seeks to find his place in life and follow his own path.
⚠️ However, traits such as impatience and stubbornness can greatly hinder Sagittarius on his journey toward his goal.
~~~~~~~~~~~~~~~~~~~~~~~~~~~~~~~~~~~~~~~~~~~~~~~~~~~
🧺 Materials
🟡 Beads
🔵 Czech seed beads, size No. 10:
⚫ Black
🟤 Light brown (for leather details)
🤎 Brown
🟫 Dark brown
⚪ White
🟣 Purple
🔴✨ Transparent Red Silver Lined (for the base)
🔹 Czech seed beads, size No. 15:
⚫ Black
⚙️ Dark gray
🟣 Toho seed beads, size No. 11 (for bow and arrow details):
🤎 Brown
⚙️ Gray
🟫 Dark brown
🍷 Burgundy
✨ Toho Treasures beads, size No. 11:
🫒 Golden glow olive
💜Metallic Purple Gold Iris

🧵 Threads & Bases
🧶 Mettler hand-quilting thread, ecru
🎣 Fishing line (for bead weaving)
🪶 Hollow fiber (stuffing)
📄 Dense cardboard (for the base)
Head
🧵 Technique: Circular mosaic (peyote), “Beaded fur”
🎨 Beads: Czech No. 10 and No. 15, Toho Treasures
🧸 Filler: Hollow fiber
--------------------------------------------------------------
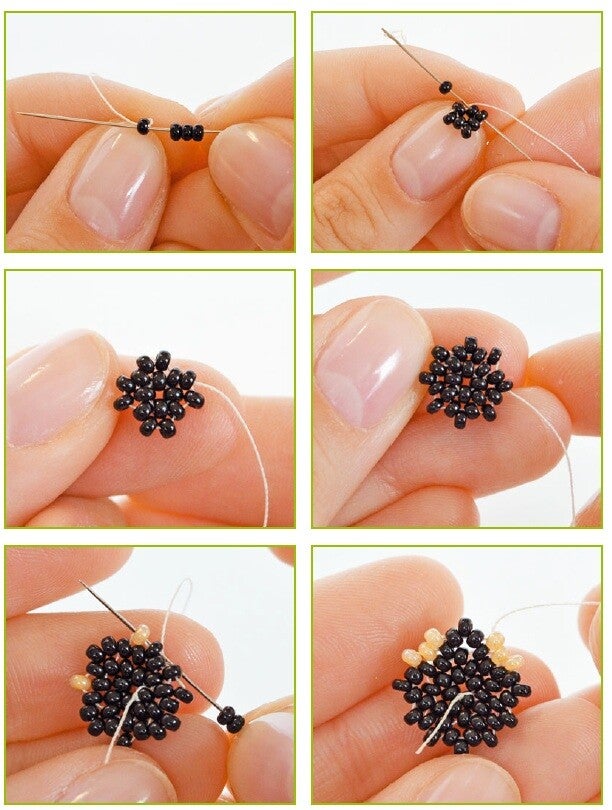
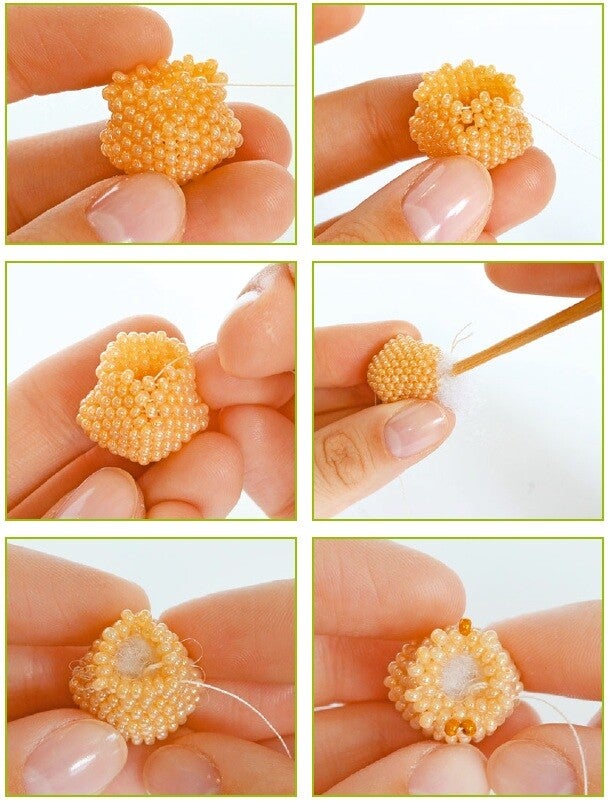
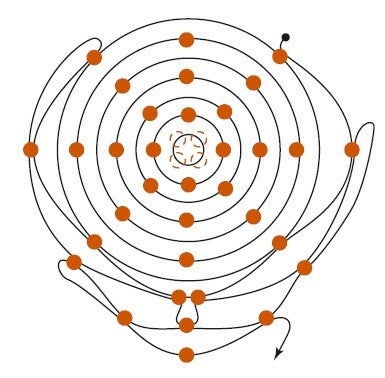
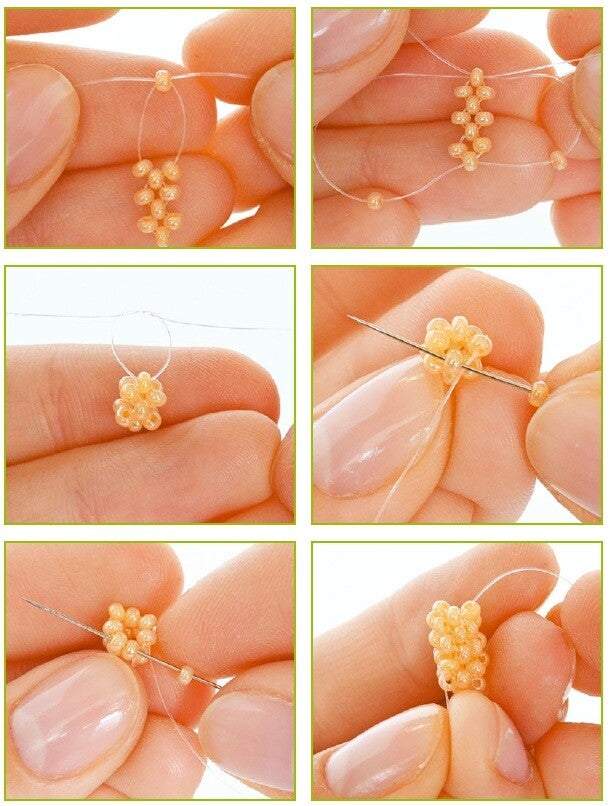
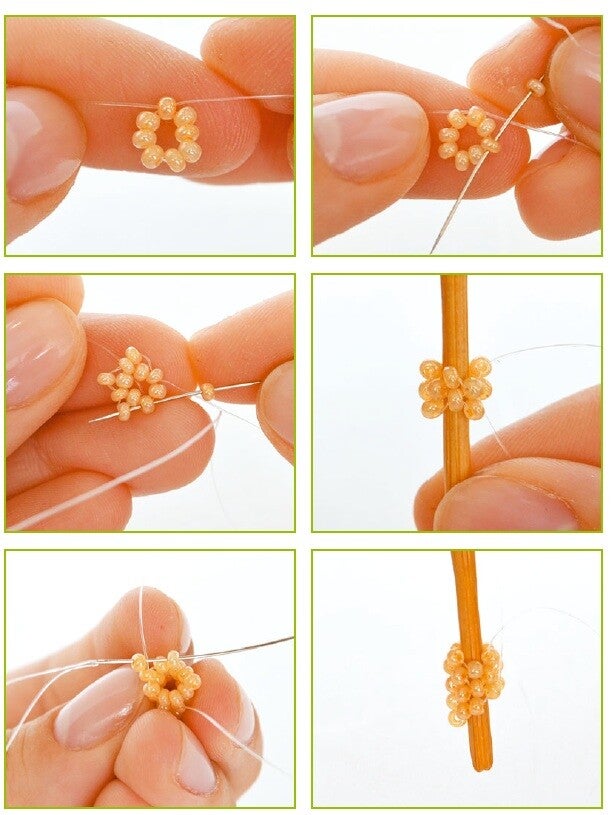
🔘 Step 1. Starting the crown
Cut a comfortable length of thread. String 4 black beads and pass the thread back through the first bead to close them into a ring.
This forms the crown of the head and the starting point of the work.
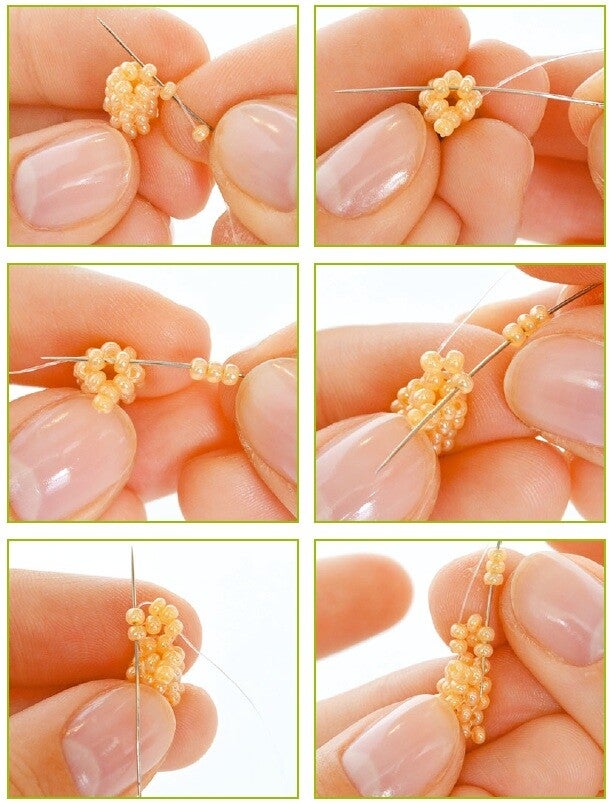
🔄 Step 2. Begin circular weaving
Start weaving in a circular mosaic (peyote) technique, working evenly in rounds.
➕ Step 3. Shaping the head
From row 3, make four evenly spaced increases.
These increases gradually expand the weaving and give the head its rounded shape.
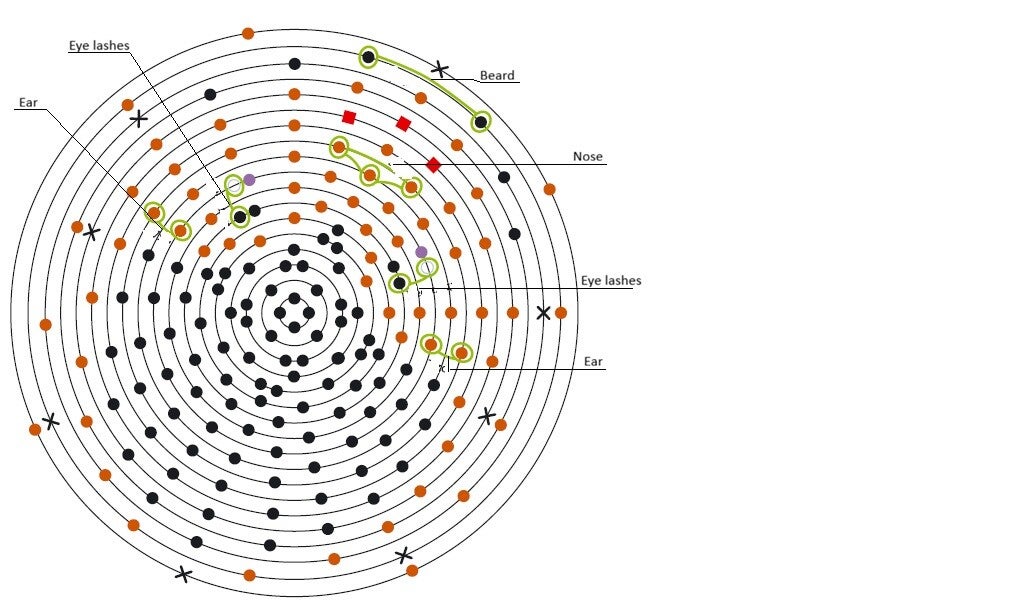
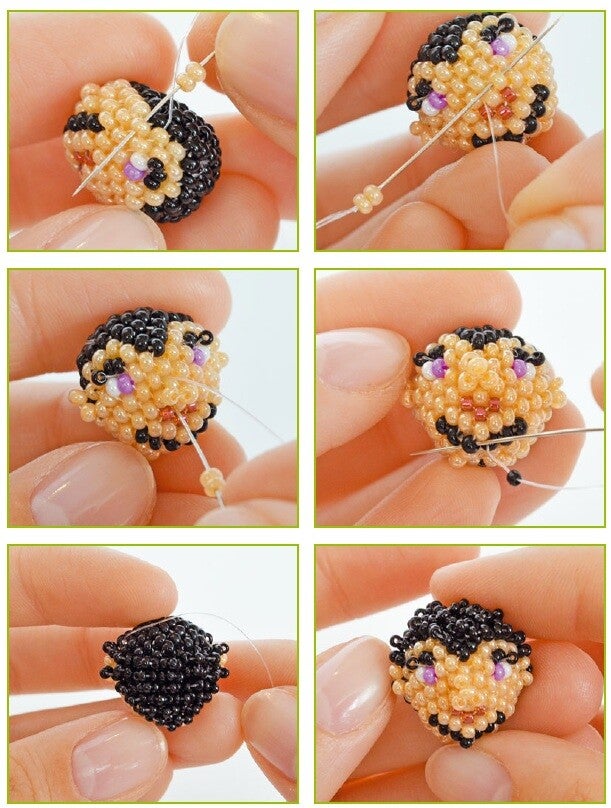
🎨 Step 4. Forming the face
From row 5, begin adding light brown beads to create the face area, following the pattern diagram.
👀 Step 5. Weaving the eyes
In row 7, carefully weave in the eye beads, positioning them symmetrically according to the scheme.
👄 Step 6. Creating the mouth
In rows 13–14, use Toho Treasures metallic gold and purple iris beads to form the mouth, adding expression and detail.
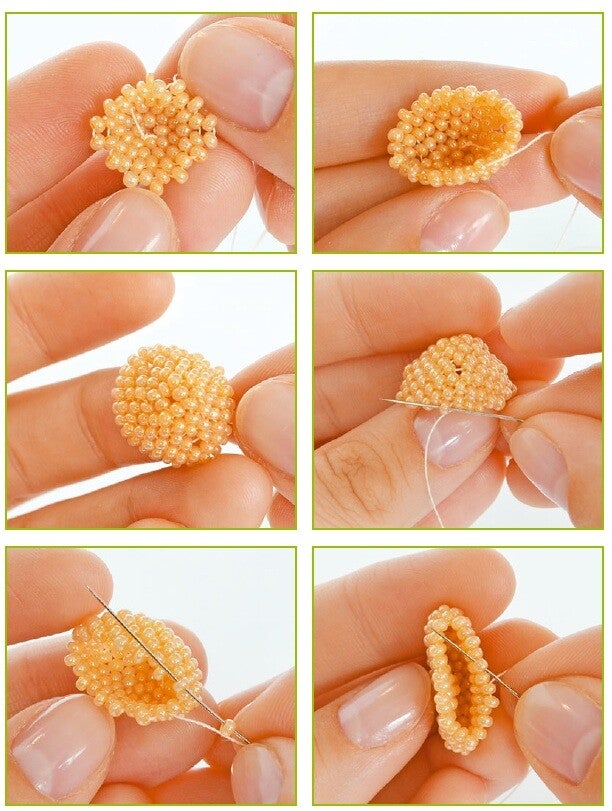
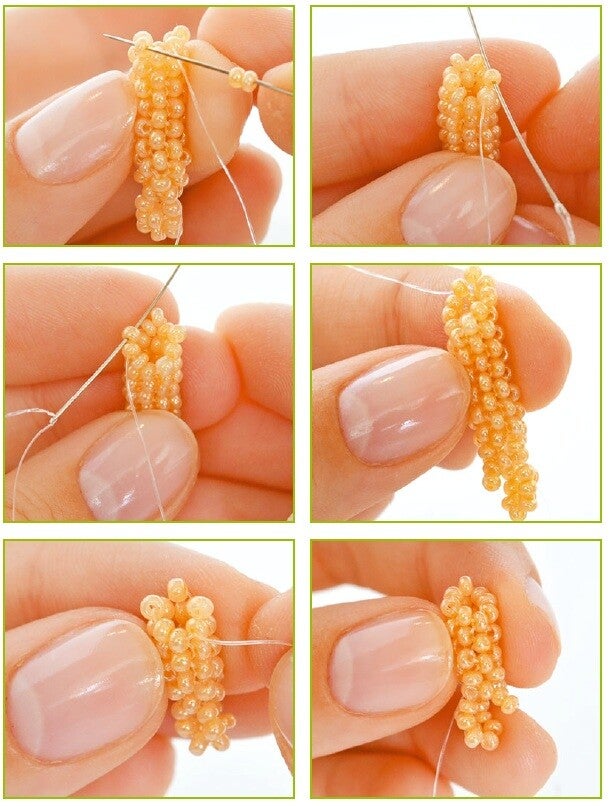
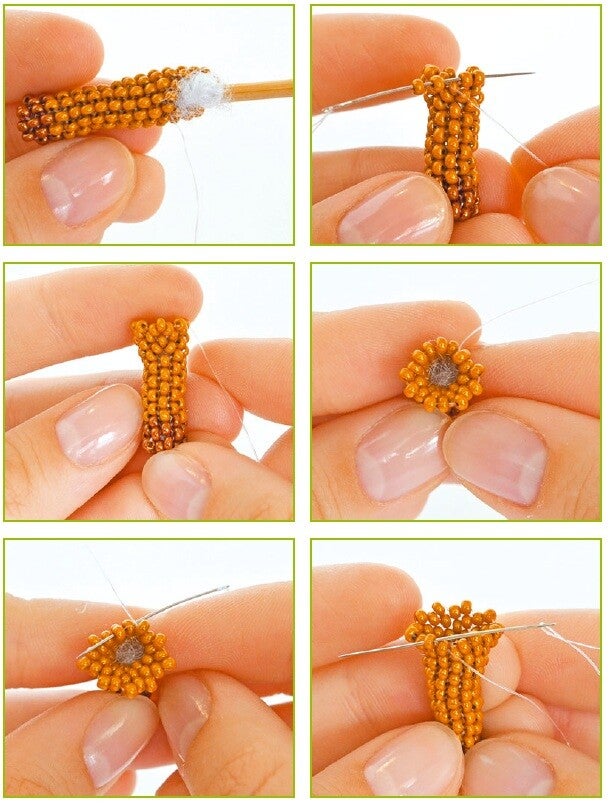
🧸 Step 7. Filling the head
As the head becomes three-dimensional, gently fill it with hollow fiber.
Distribute the filling evenly so the surface remains smooth and rounded.
🔒 Step 8. Closing the head
Finish the final row and pull the thread tight, gathering it neatly into a ring to close the head securely.
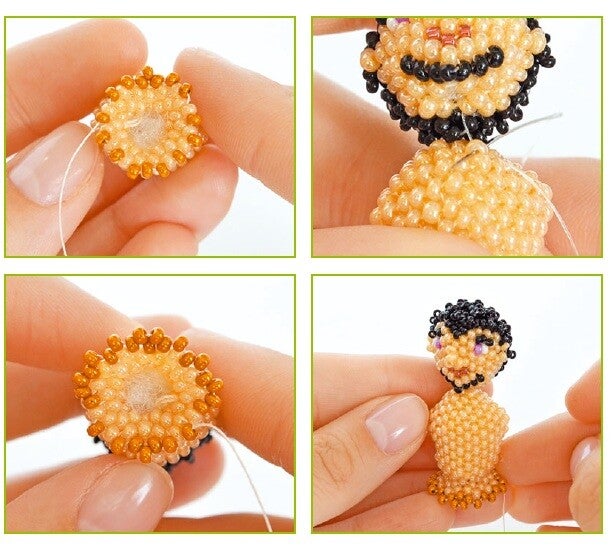
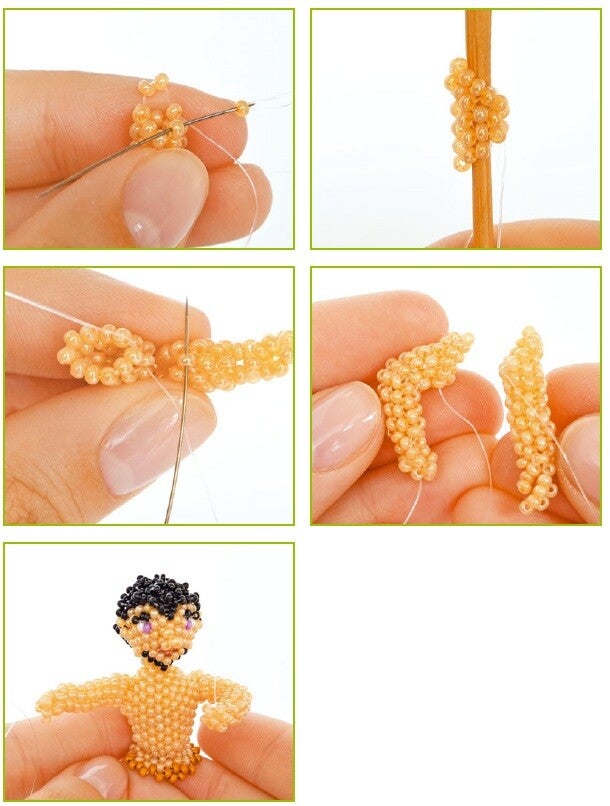
✨ Step 9. Facial details
Add the finishing touches — ears, eyelashes, nose, and beard — following the corresponding patterns.
🖤 Step 10. Hair finishing
Trim and decorate the hair using the “beaded fur” technique with black Czech seed beads No. 15.
💡 Tip: For the hair, use fishing line instead of white thread. It blends in better and makes the fastening almost invisible.


Torso
🧵 Beads: Light brown
🧸 Filler: Hollow fiber
💡 Tip:
Do not overfill the body. A slight softness will give your figure a more natural, lively, and charming appearance.
🔄 Step 1. Begin the torso
Weave the torso using light brown beads, following the pattern carefully.
Keep the thread tension even so the fabric lies smoothly and the shape remains neat.
📏 Step 2. Reach the waist
Continue weaving until you reach the waistline of the figure, as indicated in the pattern.
🧸 Step 3. Fill the body
Gently add hollow fiber inside the torso.
Insert it in small portions, shaping the body with your fingers as you go.
🪡 Step 4. Attach the head
Sew the finished head securely onto the torso.
Check that it sits straight and centered, then fasten it firmly with several reinforcing stitches.


Hands
🟤 Beads: Light brown
🧶 Techniques: Monastic weaving + Mosaic weaving
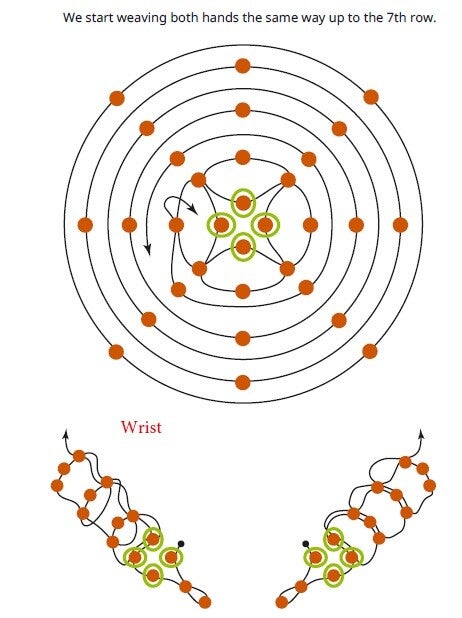
🔗 Step 1. Begin the hands
Weave the hands using fishing line and light brown beads.
Two techniques are combined here: monastic weaving (for structure) and mosaic weaving (for shaping).
✝️ Step 2. Create the base
Start with monastic weaving, forming a chain of 4 crosses.
This chain will serve as the foundation for each hand.
🔀 Step 3. Separate the threads
After completing the crosses, divide the threads:
-
⬆️ One thread goes upward, transitioning into mosaic weaving.
-
🔁 The second thread forms a beaded bundle, following the pattern.
📐 Step 4. Weave identical sections
Up to row 7, weave both hands in the same way, carefully following the diagram.
Maintain even tension so the hands remain neat and symmetrical.
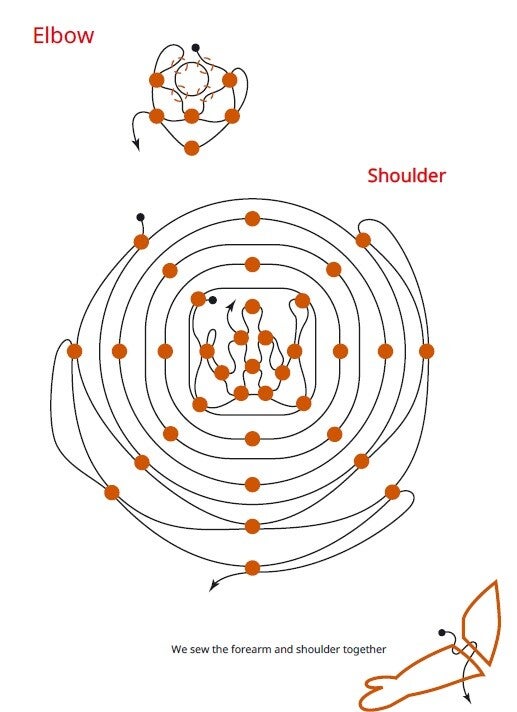
📏 Step 5. Form the forearm
Continue weaving straight for 6 more rows to shape the forearm.
📐 Step 6. Shape the arm
Create a corner using 4 beads:
-
➖ For a straight arm, continue weaving evenly.
-
🔺 For a bent arm, turn immediately at the corner to form the elbow.
🧩 Step 7. Weave the shoulder
Weave the shoulder separately, following the pattern instructions.
🪡 Step 8. Assemble the arm
Sew the shoulder to the forearm at the elbow, aligning the parts carefully.
📎 Step 9. Attach to the torso
Sew the finished arms securely to the torso, making sure they are symmetrical and firmly fixed.
💡 Tip:
Fishing line is ideal for hands—it holds the shape well, keeps angles crisp, and blends visually with the beads without distracting from the design.

Body (Torso and Tail)
✨ Tip: Do not overfill the torso—moderate filling helps the figure keep its shape while remaining flexible.
🧵 Technique: Mosaic (peyote) weaving
🎨 Beads: Czech brown (body), dark brown (tail)
--------------------------------------------------------------------------
🔘 Step 1. Starting the torso (front part)
String 3 brown beads and close them into a ring. This forms the first row and the starting point of the body.
➕ Step 2. Shaping the upper body
From the 2nd to the 9th row, make 3 increases every other row.
This gradual widening gives the torso a rounded, natural shape.
📏 Step 3. Weaving straight
Next, weave 9 rows with 18 beads per row, without any increases or decreases.
This section forms the main volume of the torso.


➖ Step 4. Narrowing the waist
In the 21st and 24th rows, make decreases according to the pattern to gently taper the body.
➕ Step 5. Adjusting the shape
In the 27th row, make one increase to rebalance the silhouette.
📐 Step 6. Lower torso
Weave 6 rows with 16 beads per row, keeping the tension even.
🔽 Step 7. Final narrowing
Starting from the 34th row, gradually narrow the body, following the pattern.
🧸 Step 8. Filling
Fill the torso with holofiber, adding it little by little so the shape remains smooth and firm.
🪡 Step 9. Assembly
Carefully sew the finished torso onto the body, aligning it symmetrically.
🐾 Step 10. Weaving the tail
Continue weaving the tail directly from the body using dark brown beads, following the pattern instructions.


Legs (Front and back)
✨ Note: The front and back legs are woven identically at first and divided later. All legs are woven on fishing line to support the heavy upper part of the figure.
🎨 Seed beads: Dark brown (hooves), Brown (legs)
🧶 Fishing line
🧸 Hollow fiber (for stuffing)
--------------------------------------------------------------------------
🐾 Step 1. Hooves
-
String 5 dark brown beads and close them into a ring.
-
Weave 4 more rows, keeping 5 dark brown beads in each row.
🦵 Step 2. Lower Leg
-
Switch to brown beads.
-
Weave 10 rows, each with 5 brown beads.
➕ Step 3. First Increase
-
In the 16th row, make 1 increase.
-
Weave 2 rows with 6 brown beads in each row.


🔀 Step 4. Dividing the Legs
At this point, divide the work into front legs and back legs.
🐎 Front Legs
-
Weave 4 more rows with 6 beads each.
-
Make decreases at the corner to shape the leg.
🐎 Back Legs
-
Make 1 increase.
-
In the next row, make 2 increases, moving toward the corner to form the bend.
🧸 Step 5. Filling
Lightly fill each leg with hollow fiber.
🪡 Step 6. Assembly
Sew the finished legs to the body using fishing line.
Bow and arrow
🧵 Technique: Brick weaving🎨 Beads: Toho beads (brown, gray, dark brown, burgundy), Toho Treasures (golden shimmering olive), Czech seed beads No. 15 (dark gray)
🧸 Filling: Hollow fiber (polyester stuffing)
🧵 The bow handle is woven with brown Toho beads on fishing line using the brick weaving technique. Sew it to the extended arm, positioning it between the palm and the thumb.
🪢 From the upper ends of the bow, stretch the string made of Czech dark gray beads No. 15 and attach it to the thumb of the bent hand.
🎯 The arrow is woven from Toho beads in gray, dark brown, and burgundy, with Toho Treasures in golden shimmering olive. Sew the arrow tip to the center of the bow handle and attach the feathers to the bent arm.
🟥 Make a red stand for the finished figure.

Add comment
Comments